Stump your partner


  • Students take a minute to create a challenging question based on the lecture content up to that point.
  • Students pose the question to the person sitting next to them.
  • To take this activity a step further, ask students to write down their questions and hand them in. These questions can be used to create tests or exams. They can also be reviewed to gauge student understanding.

Thinking-Aloud-Paired-Problem-Solving


Powerful technique for promoting understanding

  • Have students work in pairs through a worked-out problem solution or derivation in the text or a handout
  • One explains the problem step-by-step to the other
  • The other questions unclear statements and or gives hints
  • Periodically stop students and call on for explanations
  • Have them periodically reverse roles

Galería en Silencio


Propósito:

  • Fomentar la reflexión acerca de una pregunta.
  • Activar el conocimiento previo del tema que se va a tratar durante la clase.
  • Interactuar con el pensamiento de otros y conocer diferentes puntos de vista.
  • Escuchar las distintas voces de los estudiantes durante los 10 primeros minutos de clase.


Duración:

Entre 10 y 20 minutos dependiendo del número de participantes.


Instrucciones:

  • El facilitador hace una pregunta.
  • Cada estudiante toma una hoja de papel y escribe en letra grande (equivalente al tamaño 70 en la computadora)  su respuesta a la pregunta. 
  • Cuando todos tienen sus respuestas escritas, el facilitador les invita a acercarse en silencio a una pared o ventana grande y con espacio libre a pegar sus hojas. Después todos se colocan a una distancia donde puedan leer lo escrito.
  • Ahora el facilitador pide que todos lean las respuestas de los demás y que las organicen en categorías, haciendo caso a 2 reglas:
  1. Todos pueden tocar y mover los papeles las veces que quieran
  2. Nadie habla
  • Las categorización de ideas no es tan importante como que todos lean, piensen y profundicen en las ideas de otros.


Ejemplo de uso:

Al comienzo de una clase o taller para preguntar a los estudiantes qué les interesa aprender o qué pregunta o inquietud es la que más les gustaría responder durante el curso.


Galería de ideas/problemas


The gallery of ideas or problems is a tool to invite the participants to generate ideas, cluster them and see where their interest lays. It allows them to take ownership of the meeting, class or event.


The whole process can take up 20 minutes or more, depending on the number of participants and if you want to interject process (in this case you will have pauses: “process stop”), or comment on the Post-its being stuck on the wall. Be aware that it usually takes more time that expected.


In case of gallery of problems:

It is a tool that allows you to identify the problems first instead of heading straight for the solution. It is more fun to talk about the negative side of things, and it is much easier to point out what does not work. The trick is then to turn the answers around and start looking for solutions or desired behaviors. It is like taking a zigzag to the top of the mountain instead of heading straight.

NOTE! Focus on a negative which is in the control of the participants. Focus on the positive of the institution or areas outside the control of the participants.

Be careful to put the negative always in the influence zone of the participants, never outside. Eg. “What makes for a bad teacher?” and “What makes UFM great?” in case you work with teachers, “What can make UFM fail?” in case you work with the board of directors. If you look for bad things outside of your influence zone it is just about criticizing and it makes for a negative spiral.

The tool generates a lot of options. It is peculiar how sometimes only one person comes up with a problem, key aspect, element, and then in the dot-voting many other people vote for it. People complement each other in their thinking. The tool allows for a lot of ideas to bubble up before the owner/teacher comes in.

This tool puts the ownership in the hands of the participants and gets everybody involved. It does away with language problems or barriers and personality differences (shy or introvert people). The Post-it is the big neutralizer.

This is a very structured and directed exercise.

INSTRUCTIONS:

  1.     Ask the question (ideally problem-oriented)*
  2.     Check for understanding of the questions on behalf of the participants
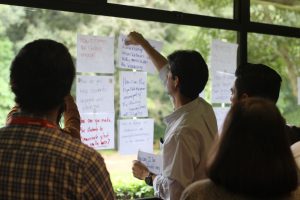
  3.     Ask for generation of Post-its – if needed in two different colors. Make clear that people should write only 1 idea per post it.

Give people time: not too much or they will generate too many post-its, not too few or they will not generate enough.

  1.     Explain the process (guidelines for the participants):
  2.    Look for affinities: twins (exactly the same) and cousins (similar but not the same)
  3.     Read your post-it aloud. No posting without reading. Only the person with the microphone*** who got hold of the microphone speaks.
  4.      Check for understanding of the other participants
  5.     In case there are no twins or cousins, start a new category
  6.     Look for somebody you know will model well to start off.
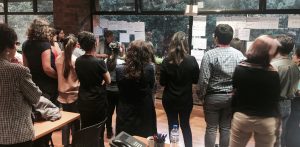
  7.     Stay near the board in the beginning. Then you step out of the circle and stand at the back. Participants should not be presenting to you, but to their peers.
  8.     If a participant helps you to point out a mistake with regard to cousin-twin, acknowledge him.
  9.     If a participant changes opinion while reading, ask him to write it down on the Post-it.
  10.     If the Post-it is too vague, point it out and ask the person to clarify. Every Post-it should be a meaningful unit and a step to the solution.
  11. Invite some participants to start clustering. The others stand by and talk. Ask the participants to put titles to the clusters.


*** The use of microphone is excellent both to ensure that 1 persons speaks at the time and that everybody is able to hear the person who is presenting his post-it.


  1. Dot-voting: Ask everybody to distribute two or three dots over the Post-its with the ideas they think are most important, they would like to work on. Clarify if you want the dots on the categories or individual post-its. If people put their dot on the individual post-it you have more precise information. You can use just pencil dots, or distribute stickers, which will stand out more.


Never let the station/event/meeting owner put his dots first.


You can also ask people to put their dots or in this case names on topics/skills they control and could teach others about, and in another color on what they need help with.

Example: What went well? (yellow Post-it) Even better if? (blue Post-it): people assigned their names on skills they would be working on later and explaining to others.


—) the dots point out where the passion, priorities and consensus lies.

—) the dots help to reduce the number of items to a workable number and to select top choices from a larger list of items; the visual display can help facilitate dialogue and increase participation in group decision-making.


  1. Bake a break: invite the people to have a cup of coffee while you talk with the owners and define the subjects that you will keep working on, or adapt the program of the session.


  1. Ask people to opt in on a topic and get together: now you have all your problems identified and people get assigned to work on the solutions.


  1. Figure out what the real problem is: root cause analysis. Or is it just smoke?

Using the 5 WHYs and the circles of influence.


  1. Work on the solution

source: Mina Merkel


EXAMPLES OF QUESTIONS:

  • What went well? (yellow Post-it) Even better if? (blue Post-it)
  • What have you used in class? (yellow Post-it) What would you like to know more about? (blue Post-it)
  • What can go wrong when we facilitate? //What do best facilitators do?
  • What do bad teachers do?
  • How could your students derail their learning?
  • Think of a good experience in a facilitative class. What did the facilitator do?
  • What can make an organization fail at supporting a school.
  • What are your expectations for today / this meeting / this workshop?

POSSIBLE USES IN THE CLASSROOM:

  • In the beginning of a new unit, class or year: to find out where the interests lay of the students, the previous knowledge about the topic, the skills, the expectations… You could then let them choose what they want to work on, or students who know about certain topics could opt in to facilitate those topics.
  • In the end of a class, year… : to revise what has been learned: what do students remember? What do they need more information or practice on? Again students could opt in to talk about what they understood well to students who need more time with those subjects.


En Español:


  1.     Se hacen la preguntas
  2.     Revisar si se comprendieron las preguntas
  3.   Pedir que generen Post-its:  poner atención al uso de los dos colores y que únicamente escriban una idea por post-it.
  4.     Explicar el proceso para crear la galería
  5.     Buscar afinidades:  gemelos o primos
  6.     Leer en voz alta.  No se colocan Post-its sin leer.  Cuidar la disciplina en esta parte de la actividad. Solamente la persona con el micrófono*** habla.
  7.      Revisar si se ha comprendido lo anotado
  8.     Si no hay gemelos o primos, se inicia una nueva categoría
  9.  Identificar a la persona que pueda servir de modelo para iniciar el proceso de pegar los Post-its
  10.   Quedarse cerca del pizarrón en el inicio de la actividad.  Después, alejarse del círculo y quedarse atrás. Los participantes que van colocando y explicando su post-it deben dirigirse a los asistentes, no al facilitador.
  11.  Si un participante tiene la iniciativa de señalar errores en la atribución de afinidades entre post-its (gemelos, primos), validar su aporte.
  12.  Si un participante cambia de opinión mientras lee su post-it, pedirle que escribia la idea nueva en otro Post-it
  13.     Si el aporte del participante es muy vago, señalarlo y pedir que clarifique.  Cada Post-it debe ser un aporte en el camino a generar soluciones.
  14. Invitar a algunos de los asistentes a hacer agrupaciones de temas (clusters).  Los demás se quedarán conversando a un lado. Después, pedir la atención general de todos para colocarle nombres a las agrupaciones de temas.

Decir algo parecido a esto:

“Ahora ustedes tienen sus problemas identificados.  Iniciemos a trabajar en las soluciones. ¿Sobre qué problemas quieren trabajar?

*** El uso del micrófono tiene dos ventajas: Solamente 1 persona habla y se le puede escuchar bien.

  1. Votar colocando un punto en el Post-it que identifica el tema que interesa trabajar (solucionar), lo que consideren más importante: se le pide a todos que coloquen dos o tres puntos en los Post-its. El dueño del grupo (cluster) de post-its no debiera empezar a colocar puntos.  Los puntos reflejarán los temas que generan más pasión y en los que hay más consenso.

You can also ask people to put their dots or in this case names on topics/skills they control and could teach others about, and in another color on what they need help with.

Example: What went well? (yellow Post-it) Even better if? (blue Post-it): people assigned their names on skills they would be working on later and explaining to others.

  1. Bake a brake: se invita a los invitados a tomar café mientras se prepara con los encargados del cluster los aspectos en los que se continuará trabajando.
  2. Pedirle a las personas que identifiquen el cluster (tópico) con el cual quieran trabajar.
  3.  Delimitar cuál es el problema real:  analizar las causas desde la raíz. Diferenciar aquellos problemas que sean solo distractores de problemas más profundos.

Using the 5 WHYs and the circles of influence: I can do it – we can do it – influence – worry

  1. Trabajar en la solución


Lineamientos para los participantes en español

  1. Alguien lee su Post-it azul en voz alta y lo pega en el crista
  2. Los demás buscan afinidades en sus Post-its: Si tienes un
    1. gemelo (exactamente igual), lo lees y lo pegas encima
    2. primo (similar pero no igual), lo lees y lo pegas al lado
  3. Si no hay más afinidades, comienza una nueva categoría.
  4. Antes de pegar el Post-It: leelo en voz alta y comprueba que los demás te han oído y entendido.


Feedback Pablito Velásquez

Some process insights that I gathered…

  1. Giving them full ownership and stand a side works fantastically! I was surprised of how much they became engaged  in the process… I wrote 0 post-its and made no categories… they did it all!
  2. The Gallery of Problems, really helped us to focus, it was like emptying the box of materials and then when voting it gave us a frame to work.
  3. The guys learned really really fast the methods and embraced them! At some point they were suggesting to use the voting and making categories themselves!!! This was just an hour into the process! The Twins and Cousins worked so well and they were so engaged that I had no problem leaving the station for a couple of minutes to get coffee, water or going to the bathroom. They were doing it so well, and they were policing each other to make it work.
  4. Although the «but» was present in the beginning, constant invitation to embrace other people’s ideas worked great… by the end they themselves were «correcting» the «buts» «no’s» and «that won’t work».
  5. You are right, the post-its, they are the great equalisers! I had two brothers, with very different personalities. One very talkative, the other quite shy. Forcing them… or rather inviting them to write on the post-its made one control his lengthy interventions and the other had a cue to get into the dialogue.
  6. It is supremely important to have control of your space… I had arranged the space prior of their arrival and when the lead owner arrived he started to change everything! I was a bit shy at the beginning, but later I asked for his trust… I said that the space was arranged in such a way for a reason… that it will help us to achieve results and that please leave as I had it before. He looked hesitant but he agreed. I’m happy I pushed for this, it really made a difference (at least for me).
  7.  Although I think it was a great session, I do believe we should be aware that this processes are energy draining… by the end I was barely standing ( look at my eyes in the picture! hahaha).  We should have a rule like air pilots… no taking a plane without 8 hours of sleep before! hahaha Really, at some points I was really making an effort not to be grumpy, pushy or tired faced (which normally is not an issue for me).
  8. I wish I had more tools in my box…  the four that we learned worked amazing and I can’t imagine how much better it should had been with more tools. I created two for this even that might be useful for you. a) Fill in the gaps… I gave them a sentence with «gaps» and they had to came up with words that filled them. For example » UFM is ??? that ??? to ??? with ???.» It was a fun «game» and yielded acceptable results in the end.  b) Play the Role… I invited participants to describe every action they had to perform in order to achieve an end. For example: «If you want to order Pizza, what do you do» and the person described » Ok, I search the phone on FB, pick up the phone, talk to the person… wait in my house… receive the pizza, open the box… etc» At the same time the other participants were writing all the ideas that came to mind just by analysing that chain of actions.  Arguably was the moment when they unpacked the most of previously not addressed problems.
  9. It is amazing how you can get in the role of facilitator… I think there is even a hint of adrenaline rush because I was dying of hunger prior to start (not recommended by the way) but once we started my hunger went to china! I got it back the minute after the final clap! hahaha
  10. I felt so happy that in the beginning they told me that possibly some of the participants had to leave earlier, but in the end everyone remained until we finished and nobody went away more than 5 minutes. My guess it was that rather than work, it was more like fun for them.

Chalk-Talk


Tina Blythe:  

What is its purpose?

  •  to get the thinking started
  • to invite people to interact with each other’s ideas and to make sense of a topic collectively, to share thoughts
  •  to pick up big themes about the subject or question that stand out for the group


Note that this routine is not intended to get clarity or an exhaustive overview of a topic. You only get the “headlines”.

When to use it?

  •  as a starter: to open up conversation, to learn about previous knowledge or experience of the participants
  •  in the middle of a session/class: to find out where we are
  • at the end: to gather insight or reflection

Instructions:

Everybody has got a marker.

Would somebody at the table write in the center of the paper and draw a circle around “…” (for example “evaluation of learning”).

Let me share with you what is about to happen: you are going to share your thoughts without actually speaking. You could write some techniques you have used, some puzzles or challenges you have, what it looks or feels like when you are being evaluated. It is kind like a little brain storm on the paper. Everybody is going to write for about a minute or 20 seconds.

Once you have written for a minute and a half, I am going to say “everybody, rotate” – people are going to move tables and you are going to read what people wrote and respond by putting a star next to something you think is important, to write some comments, some questions. The whole time there is no talking. Your pens are doing all the work. Then we rotate again and again. In the end you get to go back to your table and see what comments others have written down.

Get back to your seats: talk about what is there.

Now please also about the process

I want to hear some ideas about common themes you have seen.

Tina writes down on the flipchart:

Let us get four more ideas out.

Protocolo de Foco-Reflexión (Micro lab protocol)


Propósito

Enfocar la atención, analizar y reflexionar. Cultivar la habilidad de escuchar activamente, construir sobre y conectar con las ideas de los demás, reflexionar y discutir. Con este protocolo se asegura que todas las voces son escuchadas antes de la discusión entre todos de un tema. Los estudiantes aprenden a presentar sus ideas y compartir sus perspectivas con confianza en si mismo. 

Tiempo

Aproximadamente 10-15 minutos.

Los pasos a seguir

Primero todos reflexionan individualmente sobre una experiencia o un tema. Luego trabajan en grupos de 3.

  1. Preparación: informa a los estudiantes del tema que van a discutir y dales tiempo (unos 5-10 minutos) para reflexionar y poner sus reflexiones en papel. Explica el propósito del protocolo, y los pasos a seguir. Define el tiempo para cada paso. Forma grupos de 3 y pide que se numeran de 1 a 3. 
  2. Compartir: anuncia que es es el momento para los números 1 de compartir durante el tiempo acordado (entre 1 o 2 minutos). Las demás personas en el grupo escuchan atentamente sin comentar ni interrumpir.
  3. Pausa: anuncia que todos permanecen en silencio durante 20-30 segundos para procesar lo que se acaba de decir.
  4. Repetición de paso 2 y 3  hasta que las tres personas del grupo hayan compartido.
  5. Discusión: anuncia que ahora el grupo puede discutir durante unos 5-10 minutos. Anímalos a hacer preguntas, a referir a los comentarios que se han dicho previamente y a hacer conexiones entre las distintas aportaciones. 
  6. Reflexión sobre el proceso: invita a los estudiantes a reflexionar sobre el protocolo y cómo influyó en su pensamiento.

Claves para el facilitador

¿Cómo elegir el contenido adecuado para el protocolo?

El protocolo se puede usar con múltiples contenidos: un texto, una noticia, una cita, un diseño o un borrador de un trabajo, una reflexión sobre el proceso de aprendizaje… Cuánto más significativo es el tema, más significativo será la discusión.

Conviene hacer énfasis en los siguientes puntos:

  • Cada persona tiene la misma cantidad de tiempo para hablar.
  • Se debe dejar de hablar en el momento en que se termina el tiempo, incluso si uno está a mitad de la frase.
  • Si la persona termina de hablar antes de que se acabe el tiempo asignado, el grupo debe permanecer en silencio, utilizando ese momento para reflexionar.
  • Las personas que escuchan deben hacerlo sin interrumpir, interpretar, parafrasear, analizar, ofrecer retroalimentación o comentar mientras la persona asignada está hablando.
  • La persona que habla debe abstenerse de criticar o quejarse de quienes escuchan o de otros colegas durante su turno.

Preguntas para reflexionar después de la actividad

Una vez que ha terminado el Protocolo de la Foco-Reflexión (o cualquier otro protocolo que ensayas) es importante dedicar tiempo a reflexionar y discutir sobre la experiencia. Durante la discusión reflexiva, un paso incluido en casi todos los protocolos (incluyendo el de Foco-Reflexión) es que cada participante comente cómo el proceso le ayudó en su aprendizaje. Puedes utilizar algunas o todas las preguntas que se presentan a continuación para guiar la conversación:

  • ¿Cómo fue este proceso para ti? ¿Qué funcionó y qué no? y ¿por qué?
  • ¿Qué preguntas tienes sobre la estructura del protocolo?
  • ¿Habría sido la conversación diferente  (y cómo) si no se hubiese usado el protocolo?
  • ¿Cuáles son las ventajas y desventajas de usar este protocolo?
  • ¿Qué quisieras tener en mente como facilitador(a) de este protocolo?

En la reflexión, invita a los participantes a hacer preguntas sobre su estructura (por ejemplo: “¿Por qué no podemos hacer preguntas mientras la otra persona está hablando?”); a expresar sus frustraciones (“Yo realmente quería escuchar más lo que nos estaba diciendo Diana acerca de…, cuando el facilitador nos interrumpió”); y a ofrecer ideas acerca de cómo podrían utilizar el protocolo en un futuro.


Fuente: Julian Weissglass, Universidad de California Santa Barbara, y adaptaciones de Tina Blythe y David Allen

Escalera de Retroalimentación


Propósito

La escalera de retroalimentación es una herramienta para brindar retroalimentación constructiva sobre una idea, un trabajo o un proyecto en proceso.

Tiempo

Varía de 10 a 60 minutos. La duración depende de la complejidad del proyecto y del número de participantes. Por lo general dos a tres minutos por paso proporcionan una amplia gama de respuestas.

Actividad

Paso 0: Presentación

El presentador describe la idea, el trabajo o el proyecto en el que está trabajando. .

Paso 1: Clarificar

Los miembros del grupo hacen preguntas para clarificar y asegurarse de que entienden la idea o el tema en discusión. El presentador aclara las dudas.

Ojo: Algunas preguntas son críticas disfrazadas de preguntas. Evítalas.

Paso 2: Valorar

Los miembros del grupo expresan lo que les gusta de la idea o asunto en cuestión en términos específicos. El presentador toma notas en silencio.

Consejos:

  • Se lo más específico posible.
  • Evita los «bien, pero» que conllevan una crítica negativa.
  • No se trata de simplemente ser amable. Es importante saber qué aporta valor para seguir haciéndolo o mantenerlo.

Paso 3: Expresar inquietudes y compartir  preocupaciones

Los miembros del grupo exponen dudas y preocupaciones mientras el presentador sigue tomando notas en silencio.

  • Consejos: intenta usar términos calificados como  «Me pregunto si …» o «Me parece que …»).
  • Evita criticar de manera personal. Concéntrate en las ideas, productos y aspectos que se han expuesto.

Paso 4: Hacer sugerencias

Los miembros del grupo hacen sugerencias sobre cómo mejorar la idea, el proyecto o el trabajo.. El presentador sigue sin hablar.


Claves para el facilitador:

Durante los pasos 2 a 4 no hay contacto visual entre el presentador y los participantes y los participantes hablan sobre el proyecto como si el presentador no estuviese presente.

Después del paso 4 se le invita al presentador a agradecer por el feedback y a hacer unos comentarios generales sobre lo que ha escuchado y su intención.


Preguntas para después de la actividad:

Último paso: Debrief del proceso

Todos reflexionan sobre el uso que el grupo le dió al protocolo. ¿Qué retos tuvimos? ¿Qué fue útil de este proceso?


Posibles usos de la escalera de retroalimentación

  • Para profesores: retroalimentarse mutuamente sobre sus proyectos y diseños de clase.
  • Para estudiantes: retroalimentarse mutuamente sobre sus trabajos, ensayos y proyectos.

Fuente: Project Zero, Harvard Graduate School of Education. http://www.pz.harvard.edu/resources/ladder-of-feedback

Otras fuentes de información: Hay sitios excelentes que proporcionan instrucciones y ejemplos de la Escalera de Retroalimentación. Aquí hay algunos ejemplos:

  • Video que explica cómo funciona la escalera de la retroalimentación y sus instrucciones

Click here to download the Ladder of Feedback instructions in English

Quicklist and Build method


Quick List Method


Use:

The “Quick List Method” is a brainstorming tool that collects group input in a quick manner.

Brainstorming creates a framework for all members to share their ideas and to generate a list of items for further discussion or to display in the room.

Brainstorming is meant to be an engaging, creative process for groups to gather and capture their ideas on a wide-range of subjects. It can serve as an easy way to engage a group in a discussion. It is a great icebreaker in the beginning of class or event.


Examples:

  • to create the norms of conduct of your class: Ask “What could turn this class into a total disaster?” Then you turn it into the positive. (people can do it on a T-chart)
  • to learn about interests or previous knowledge about a topic
  • to review topics from last class and see what stuck
  • to review topics at the end of the class
  • to get a range of questions people have about topic
  • to activate knowledge about a topic


Instructions:

  • Ask a relatively simple question
  • Have group divide up into groups around a flipchart
  • Ask the team to pick a scribe and a presenter
  • Ask them to generate as many ideas as they can in 2 minutes
  • Ask them to put a title on top of the chart so that we know what the chart is about when we expose in the space later on
  • Ask people to not judge the ideas
  • Ask participants to report to the bigger group


Note: this exercise is easier and more fun in the negative, especially as an icebreaker. Then you can turn it into the positive.


Instructions for the participants

  • In table teams / groups of (5)
  • On a flipchart quick list all …
  • Put the title on your flipchart.
  • Pick a scribe and a presenter.
  • You have 2 minutes! Go!


For the facilitator

  • After a group presents, ask for a round of applause.
  • If you are working in the negative, ask people to draw a big international sign for prohibition through it.
  • Then say: what we have done in the negative, we have goals in the positive: let’s strive for, let’s get rid of… You can comment that it is a funny way to do it in the negative but that it is very serious business.


Examples of questions:

  • How can this organization (PTSA, school board, teacher, student….) fail?
  • What could turn this event / year a complete disaster?
  • What do bad teachers / students do?
  • How could your students derail their learning?
  • List all of the worst student behaviors and actions you can think of….

Build Method (use together with the quick list)


  • As the first group reports out, have the subsequent groups check off the exact ideas with the intention they will not repeat them
  • Have the presenter only present the new ideas
  • Subsequent boards continue to check off
  • Report only new ideas to the bigger group
  • At the end of the presentation, it is much easier to see what elements are complementing and to compile one single list: all the items that are not checked off.